With hundreds of pages of scriptures, manuals, and Church magazines, it seems impossible to use it all. But tools like the Gospel Library app are a wonderful way to study the scriptures, general conference talks, or the teachings of latter-day prophets anytime and anywhere. Check out these six things you didn’t realize the Gospel Library app could do to make studying the gospel just a little bit easier and more meaningful.
Note: While the general functions of the Gospel Library app are the same, the way they are accessed may vary slightly from device to device. This article was originally published in 2015 and is periodically updated to include new features released by the Gospel Library app.
1. Conference Study Notes Pages
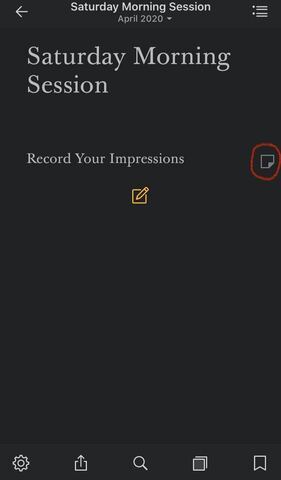
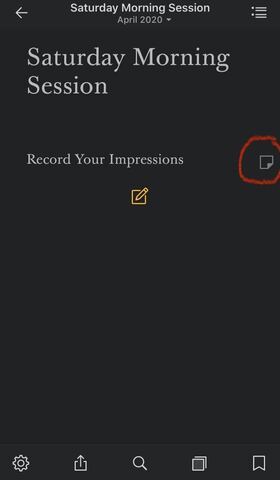
With a memorable general conference just around the corner, the gospel library app has released a fun new feature: a "Record Your Impressions" page for each conference session! Even though the music and messages have not yet been released for this upcoming conference, if you navigate to the April 2020 conference page, you will find five headings—one for each of the sessions. Click on one session page to bring up the "Record Your Impressions" page and click the little pencil and paper icon to add a note or thought as you listen to that session of conference:
(Note: The example is using the dark theme of the app, so your colors may appear different.)
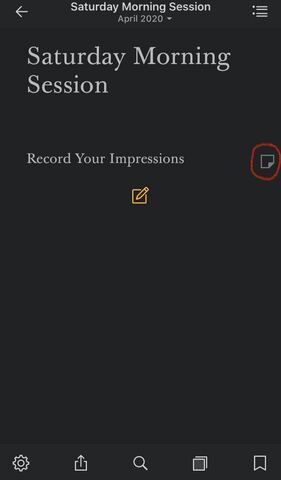
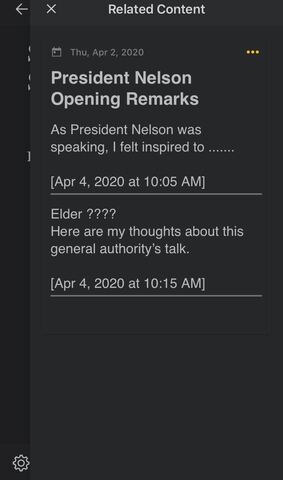
Once you have made a note on this page, you can either click the pencil and paper icon again or click on the little note on the side to edit it. You can also see your note and other related content by clicking on the small dot and line icon in the top right-hand corner.
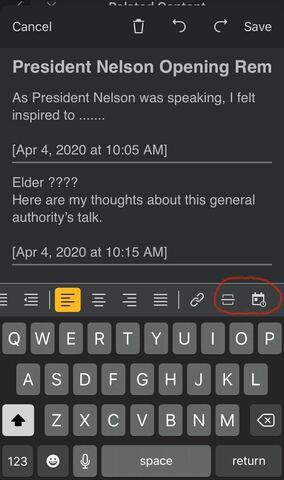
You can use the "Record Your Impressions" page in a variety of ways. For example, write down the questions you hope to find answers for this conference before it starts. Use it after each session to record your general thoughts and impressions. Or use it throughout conference sessions to keep notes for each speaker. You can also keep your recorded thoughts organized in one note by adding a timestamp and a line between talks if you'd like:
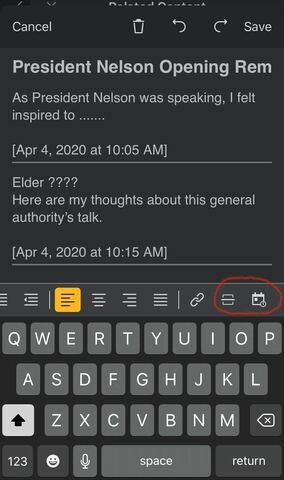
Horizontal line and timestamp tools are found by scrolling to the far right on your tools bar. They are circled here.
However you choose to use this new note tool, the note will show up as related content when you open those talks in the future, helping you remember the promptings and thoughts you wrote down during conference.
2. View Related Media Content in the Footnotes
Planning a family Come, Follow Me study and can't remember if there is a new Book of Mormon video to go along with what you're reading? Now all you have to do is click on the footnotes. A recent 2020 update puts paintings and images, videos, and articles right in the footnotes of the verses they relate to. Watch the video of Christ's birth as you read Luke 2 without even leaving the screen, or let your family study an artist's rendition of Enos praying as you read about it.
*Tip: Watch for the picture symbol next to verses you are reading. This indicates that there is a picture in the related content that goes along with that verse. You can click the related content symbol in the top righthand corner of your screen to view them in context with the other scripture references and footnotes or click on the symbols themselves to see just the media content.
3. Customize Your Study Notes
I don't know about you, but as I am studying my scriptures, I love to go back and read the insights or thoughts that I had the last time I read that scripture. The only problem was that if I wanted to add to a thought or fix a spelling error (even grammar nerds make mistakes!) it would update the note timestamp, causing me to forget when I originally had the thought or idea. With the latest update of the Gospel Library app, however, that problem is solved! I can now add individual timestamps to each of my notes! Want to know what else you can do with your own notes?
- Make a title for your note. It's a great way to give your memory a quick jog about the topic your note is focused on.
- Bold, underline, italicize, or strikethrough your text to emphasize what you want to remember.
- Making a note that references a recent conference talk, or even a blog post you read online? Now you can hyperlink it—the next time you read your note, one click will take you straight to the article you were talking about!
- Create bulleted or numbered lists, indent or align your text, even add an emoji to help you remember your thought.
4. Create Multiple Study Plans and Add Daily Reading Reminders
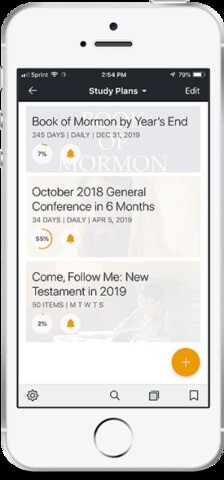
If you like setting goals and studying on a schedule, you’ll love the Study Plans feature in the latest update of the Gospel Library app.
The new Study Plans feature helps you set up your own schedule to study any content found in the Gospel Library app. Whether you want to set up a regular reading schedule for Come, Follow Me or study all of the latest general conference talks, this new feature will help you reach your goal and enhance your personal gospel study.
Study Plans automatically calculates exactly how much you need to read each day to achieve your goal by your selected date. If you miss a day or two, you can reset the study plan and it will recalculate your goal for you.
Available for both iOS and Android devices, the new Study Plans feature makes individualizing reading schedules quick and easy.
Creating a Study Plan
Open the Gospel Library app, select Study Plans from the Library menu. Select the content you wish to study. You can set a daily schedule and add a reminder to notify you to read each day.
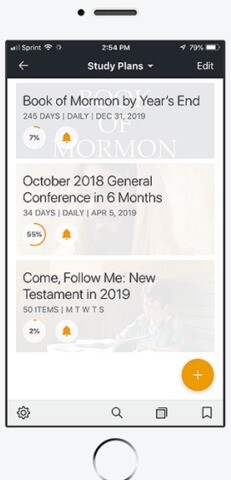
1. Select content
Choose from any content in the Gospel Library app.
2. Set a schedule
Setting a schedule enables you to see how much you need to read each day to hit your goal and finish on time. You can select “daily” to read each day or click on the specific days you wish to study. You can add beginning and end dates and indicate whether you want to allow chapters or talks to be split.
3. Add a reminder
Adding a reminder can help you stay on task. Select the time you want to receive an on-screen reminder to study.
4. Measure your progress.
Each study plan shows the content, the schedule, and how far along you are in your progress. Checkboxes and a list of what to study each day helps you visualize your personal study plan as you track your progress each day.
After selecting the options, your new study plan is created. You can create multiple study plans to enable you to study different content on whatever schedule you choose. When you click on the specific study plan, you can use the checkbox to mark your progress as you read each chapter, article, or section in your study plan, making it easy for you to track your progress.
5. Organize Study Information and Locate it Anywhere
Highlighting and underlining
In all the materials in the Gospel Library app, you have the ability to mark your favorite passages or quotes, just as you would mark them in your paper copies. By holding your finger on the word or section you would like to highlight and adjusting with the indicators on each end, highlight anything from one word to a few paragraphs or verses. Take it a step further by clicking on the colored icon and choosing an underline instead of a highlight, or a different color. Sometimes I even like to add an extra highlight of a different color or style within a previous highlight.
*Tip: Many versions of this app also allow you to post your favorite highlights or talks on a social media site. Just click on the “share” option.
Creating notes, tags, and links to related materials
In addition to highlighting, you can also add tags to help categorize the things you are reading (for example, I have a tag for quotes about charity or service), write a note or thought you had while reading, or link the section you are reading to something related somewhere else.
The beauty of the Gospel Library app is that you are not limited the way you are with paper copies. Your notes are not confined to the tiny margins of your scriptures or manual, and you don’t have to track down last year’s manual or find the family hymnbook to remember the connection you made while listening to this month’s general conference. I know it makes things easier for me when everything is easily accessible from one place!
Bookmarks
Can’t remember where you left off in your scripture study? Try creating a bookmark. After you create it, you can give it a label or adjust it to be next to a specific verse. I have a bookmark called “Personal Scripture Study,” another one called "favorite scripture," and others marking significant scriptures that I look up frequently. It makes it a lot easier to simply open my bookmarks and click instead of going through and finding the book, chapter, and verse every time.
*Tip: If you don’t want to create bookmarks but still want to remember certain sections, recent updates to the Gospel Library app now allow for an unlimited number of screens—simply leave open in a screen the section you want to remember. You can also change the order that you see the screens in, or close an individual screen (usually with the “edit” option or by simply dragging and dropping or sliding, depending on your device).
**Note: When you sign into the Gospel Library app with your ChurchofJesusChrist.org account, you can also access all of your notes and highlights by signing into ChurchofJesusChrist.org, where all the same marking options are available.**
6. Plan a Talk or Lesson
If you are studying to give a talk or lesson about a particular topic, compile your highlights, tags, and notes into a labeled study notebook. On the homepage, click on the section labeled “Notes.” Here you can create and label a new notebook, or update an old one. If you have previously tagged scripture or quotes, you can sort those into a notebook, or you can create a new “journal entry” and record your own thoughts or comments along with the quotes you’ve found.
I have several notebooks that I’ve used when giving lessons in Relief Society or speaking in sacrament meeting. I also have notebooks centered around a specific study theme, such as “charity” or “the Atonement.” After you have compiled and arranged everything the way you want it, you can use the notebook on your device, or simply print it off for easy use at church!
*Tip: The search function (a magnifying glass icon) will search for keywords or phrases in any downloaded materials you have and will sort it according to type (scriptures, general conference, etc.). For instance, if you can’t remember where you heard a certain phrase from President Monson used in a talk, you might search for keywords from it and then look under the “general conference” search results. Search will only look for the phrase in content you have downloaded in the Gospel Library app, however, so if you want to search all the past conference sessions, a 2020 update allows you to simply long-press the general conference collection to instantly download everything in that section.
*Tip: In some versions of the Gospel Library app, highlighting a word also gives you an option to look up the definition while staying in the Gospel Library app. Not sure what the word “beguile” means? Just highlight it and click “define” to use the “dictionary definition” in your talk!
*Tip: Most updated versions of the app give you an option at the bottom of your screen to listen to gospel materials. Get a head start thinking about your talk by listening to different materials during the week, then go back and study them more closely later when you hear something that applies.
*Tip: A 2020 update now lists topic tags at the end of general conference talks. Simply click on the topic you're interested in and a list of all the conference talks on that topic will appear!
7. Adjust Display for Easier Reading
Hiding Footnotes and Menus
The footnotes can be a handy feature, but sometimes having them up takes up too much of my screen and makes is difficult to read. Click the box with the line through it at the bottom of the screen to hide the footnotes, or double-tap the screen to hide all the menus and options. Bring them back by double-tapping again.
*Tip: Some versions allow you to view materials without linked annotations and footnotes. Find those options under “settings” and check both boxes.
Font Size and Style
If you have trouble reading the text on the app, make it bigger or change the font style under “settings”
*Tip: Some versions of the app have an option called “night-view” under the settings. By turning this night mode on, it changes the background of your Gospel Library app screen to black, making it easier on your eyes to read at night or study for a few minutes before you go to bed.
Language
Whether your first language is Spanish or you learned German on your mission and want to keep it up, changing the language on your Gospel Library app is a great way to look at the scriptures in a new or easier way. In most versions of the app, this can either be changed under “settings” or by clicking on the globe icon.
Lead image from Thinkstock
